This page is dedicated entirely to teaching you how to do the MapleStory guild flag race. Whether or not you're actually in the guild, it helps to know how to do the race so that you can help your own guild out. At some point, I'd like to add a video tutorial of it, but for now, screenshots will have to do. There are also videos available in the Video section of the site that showcase Reconcile members participating in the races.
INTRODUCTION
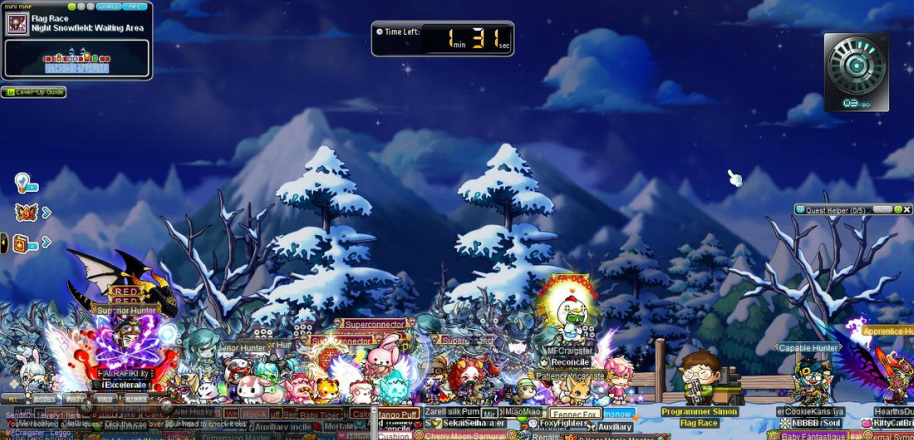
The guild flag race is held every day of the week, bar none, at 12 PM, 7 PM, 9 PM, 10 PM, and 11 PM. These times are all PST/PDT (Pacific Standard Time/Pacific Daylight Time), so you do the math based on your timezone. An envelope will appear above your head that will allow you to enter. You WILL NOT receive the envelope if you are in the Free Market, Ardentmill, or the Event Hall. Once you enter the lobby map (see above screenshot), you'll wait inside for a little bit over a minute and a half before the actual race begins. If you're doing your first guild race, talk to Programmer Simon. He gives you the guild quote ring and completes your flag race quest (if you accepted it).
The lobby is incredibly crowded, especially in more populated worlds (Scania, Windia, Bera, etc). Sometimes, for weaker machines, you will disconnect from the sheer amount of lag you're experiencing. It IS possible to log back in and still participate. The timer runs for a decent amount of time. This is enough time to possibly re-enter the channel 1 lobby before the race begins. KEEP IN MIND that if you choose to log into a different channel, the timer will continue to run, but if you don't have a sufficient number of people participating, the race will not start.
Just as an extra little tidbit, make sure to take out any pets you may have as well. This will be explained later on.
TABLE OF CONTENTS
To reach these sub-sections, use the Ctrl + F (Find) function and type in the corresponding code in brackets.
Course One [CRS1]
- Path One: The Scenic Route [P1SR]
- Path Two: The Shortcut [P2S]
Course Two [CRS2]
Flag Race Skills [FRS]
Helpful Tips [HTPS]
Strategies [STGS]
Course One [CRS1]
- Path One: The Scenic Route [P1SR]
- Path Two: The Shortcut [P2S]
Course Two [CRS2]
Flag Race Skills [FRS]
Helpful Tips [HTPS]
Strategies [STGS]
THE COURSE
The guild flag race happens 5 times in a single day, but the course isn't the same in every race. There are two different courses: the 7 PM course and the 12 PM, 9 PM and after course. In order to win both races, you must complete the entire course three times. It doesn't matter how you accomplish this as long as you enter the finish portal three times.
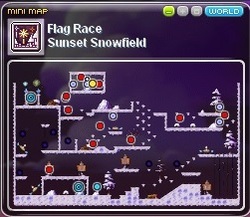
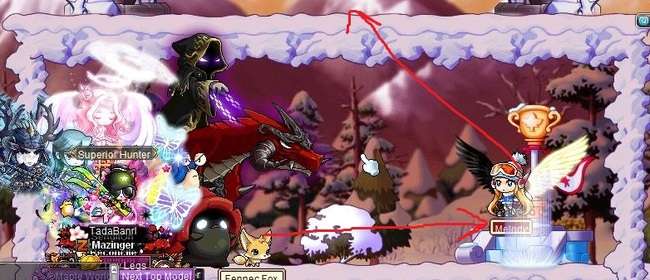
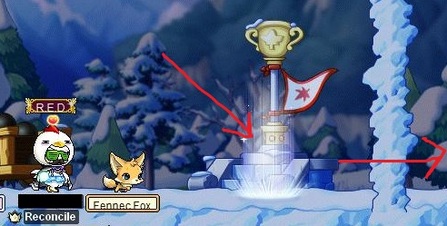
This is the general layout of the first course. For the 7 PM race, this is the one you'll be trying to complete. It is a lot faster to complete than the second course, but you need to know the proper strategy to do it. To the right of the highest portal on the map sits the winner box. When you've completed the race, you will be teleported into this rectangular box; you cannot use any skills at this point.
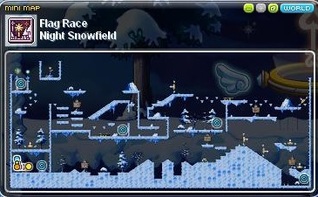
This is the general layout of the second course. As you can probably tell, it's a lot longer than the first course and only features one direction you can travel. The only way to make the second course go faster is to utilize your flag race skills, which will be explained later on in the guide. While it isn't as much of a rectangle as an open-ended quadrilateral, the winner box is still to the right of the highest portal.
COURSE ONE [CRS1]
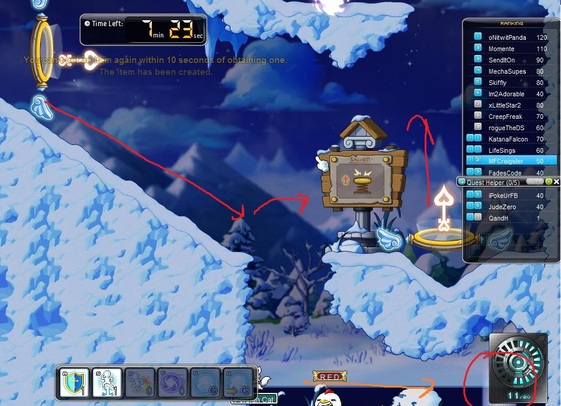
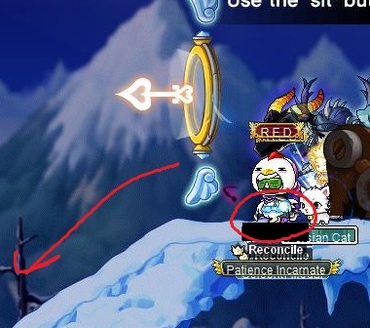
At the start of the race, you're inside this rectangular box thing. There's nothing here except a portal to go through, so walk towards it and use it to leave. It'll teleport you out of the box so that you're standing on top of it.
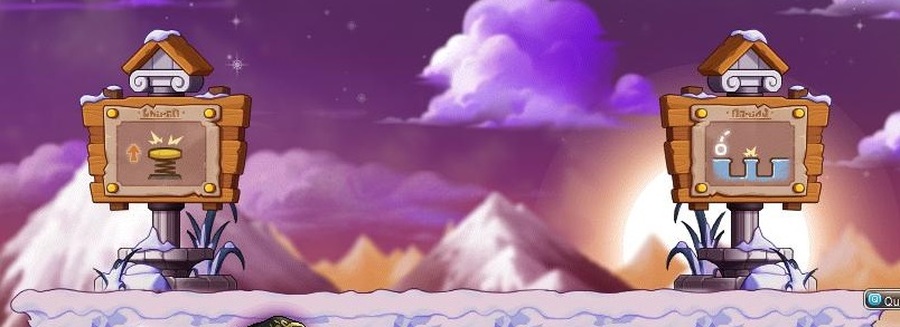
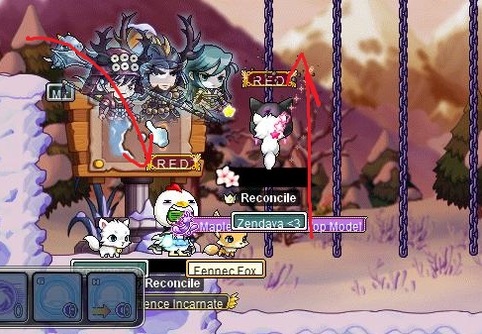
Okay, this is where the first race starts to get interesting. Unlike the second course, the first one gives you two paths to take. These signs actually have nothing to do with the paths (they're just hints on how to do the race), but it seemed like a fitting picture to use. The left path is much faster than the right path, exceedingly so. So why take the right path at all? Arguably, the right path is much easier to do than the left, but with a little bit of practicing, the left path should end up being easier. This guide will cover both paths, so you can pick whichever one you like better.
Path One: The Scenic Route [P1SR]
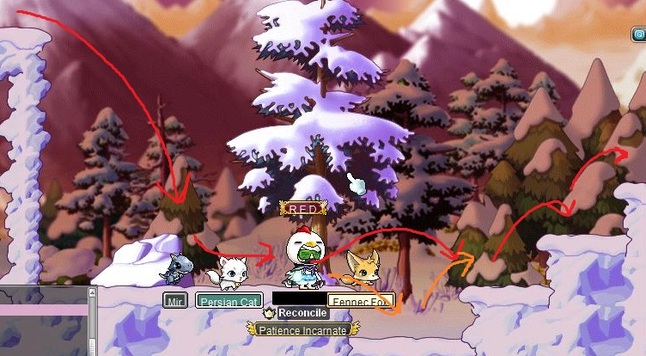
To take the scenic route, jump off of the box to the right. This is generally the path newer racers take because the other side gets really confusing. Follow the red arrow towards the first ditch in the road. You have two options here: jump over the ditch or slide into it and then jump out. Either one is fine; just make sure you don't cozy up to the side of the step. If you do, you'll get stuck jumping there until you back away from it a little. Climb the steps.
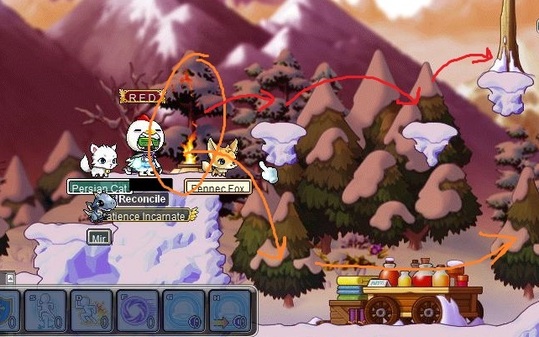
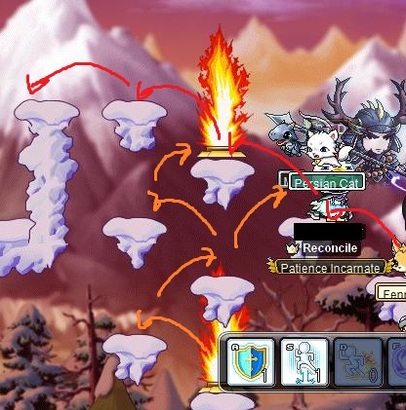
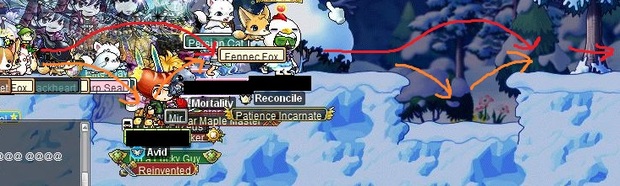
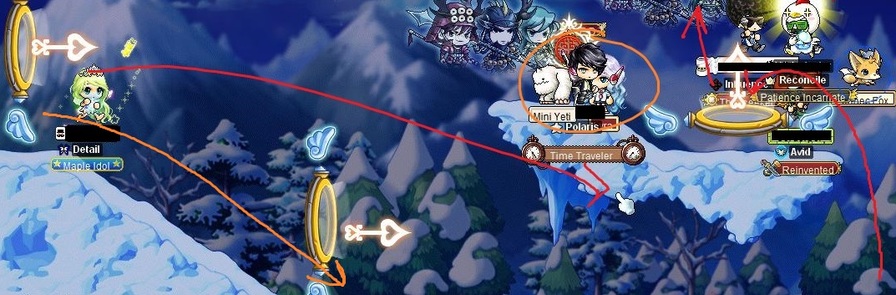
A couple new things here. First off, the orange circle shows where the first flamespitter is. Every other second or so, it will shoot out flames that will damage and displace you, much like obstacles in other jump quests. Sometimes, this can be useful for getting through other obstacles; most of the time, it's just there to screw you over. You can choose to get hit by this one or not, it really doesn't matter too much. Second, you can take two paths here. The orange route is a little bit slower, but takes you to the exact same destination as the red route. Just follow whichever arrow you feel you like best.
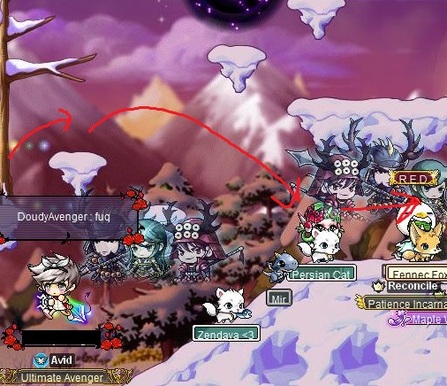
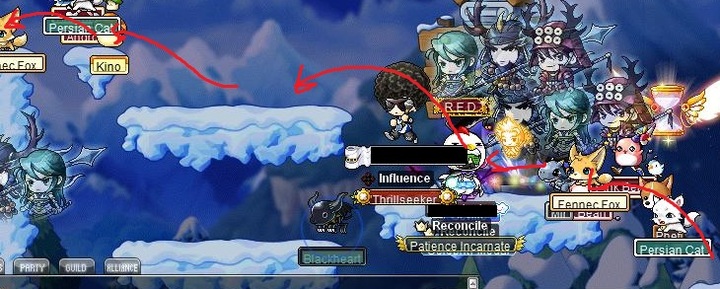
Keep following the red arrows. See that weird black void looking thing that I cut off at the top? Don't worry about that just yet. Don't worry about that platform above the chicken's head, either.
Also, Doudy being a noob.
(Don't ask why I censored the names; it's not consistent and they show up in the video tutorial anyways.)
The next part involves climbing up some chains. After jumping down from the cliff in the last part, you'll enter a pit with four chains that you can climb. The red arrow blocked the sign, but it's just warning you that rocks fall down where the chains are. You can pick any of them to climb up, it really doesn't matter too much. Also, the falling rocks won't knock you off, so just keep climbing up and ignore that you're probably taking like 200 damage.
The next part introduces another new thing: a launch pad. Just jump on it and it'll send you in the direction of the glowing arrow. Follow the red arrows up to the next portion of the race.
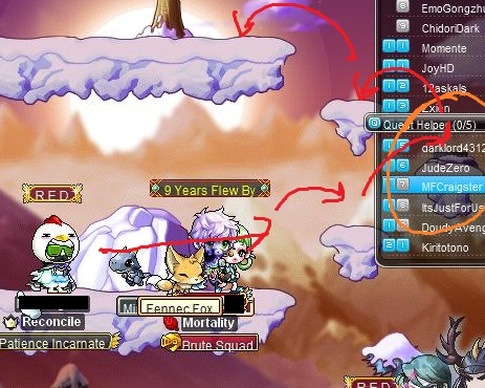
Okay, this part is actually kind of tricky. The only reason why is because of the leaderboard window. Even in the screenshot it's a little difficult to see entirely, but behind the board is a flamespitter. I've circled where it is in orange so you know where to look, but in the actual race, it's easy to miss. Other than that, this part is pretty straightforward. Just watch out for the flamespitter on the way up and you'll be fine.
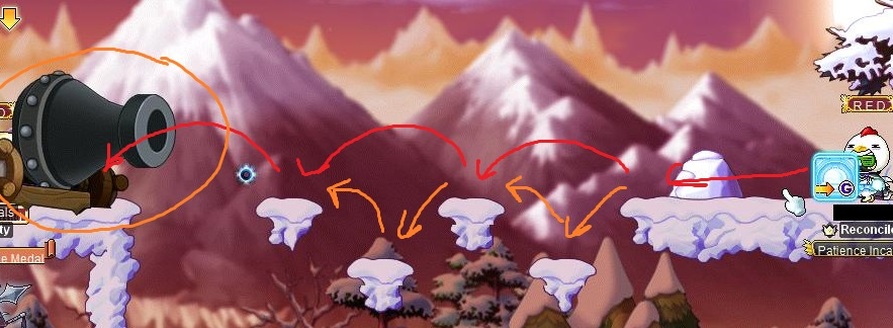
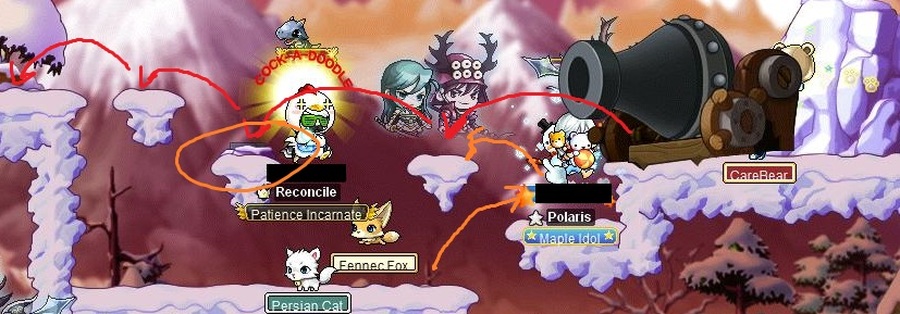
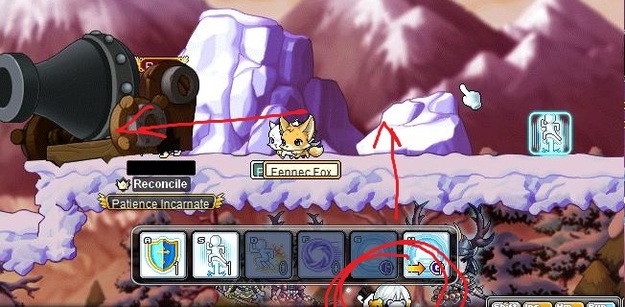
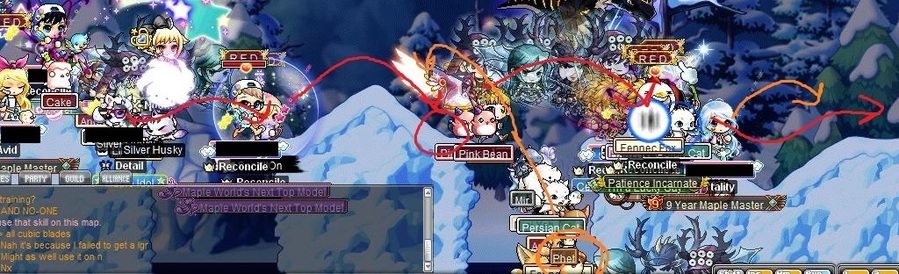
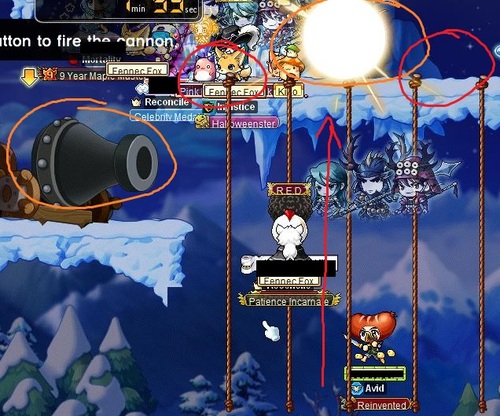
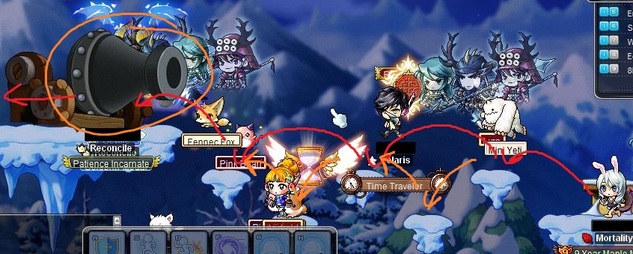
At this part, you reach your only real annoyance in the entire race: the cannon. It's useless when nobody's using it, but if someone in your race is douche-y enough to get behind one of these, have fun trying to get across these platforms. The cannon will fire a cannonball at a certain trajectory (based on what the cannon user decides), and if you get hit by it, it stuns you for about 3-5 seconds. This is plenty of time for you to fall off a platform, and it doesn't help that once you get hit, it pushes you and makes you slide against the ice. The throwing star in the picture is just someone attacking.
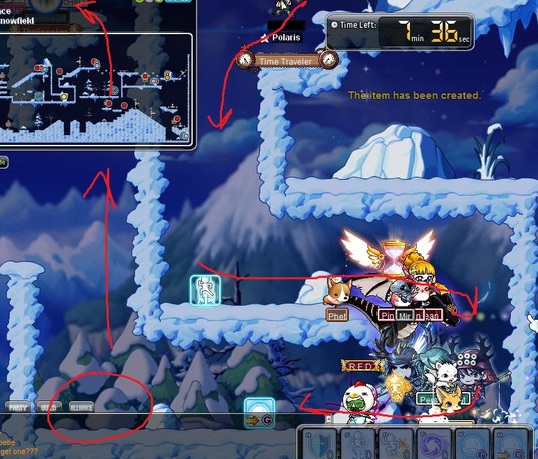
Next to the chicken, you can see a blue square with a G on it. This is one of 6 power ups that you can use throughout the race, but that's explained further in the Flag Race Skills section. Continue across these small platforms by following the red path or the orange path.
Next to the chicken, you can see a blue square with a G on it. This is one of 6 power ups that you can use throughout the race, but that's explained further in the Flag Race Skills section. Continue across these small platforms by following the red path or the orange path.
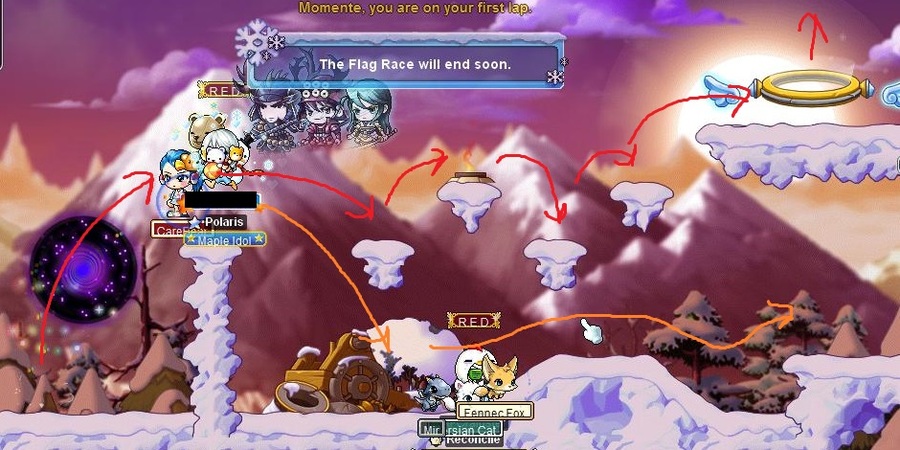
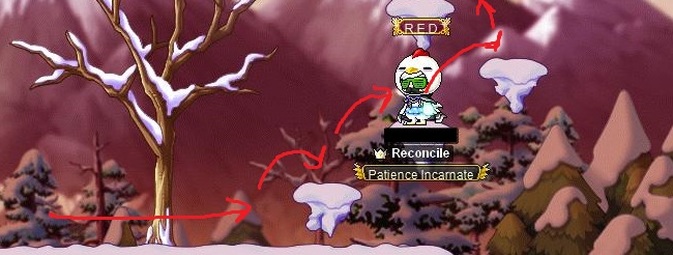
Once you've passed the cannon, you'll reach a group of platforms that seem to lead down somewhere else. This part is actually more relevant to the shorter path, but in case you fall off, you follow the orange arrows back up. Be careful of the flamespitters; it's better to wait for them to subside before jumping than to hit them and fall off. Follow the red arrows across and jump down the little wall.
This is actually the final stretch of the race, so get past this and you'll be done with your first lap. First, you'll notice that there's another cannon here. Yay. Second, there's a flamespitter where the orange circle is; don't get hit by this one unless you're facing the left platform. If you fall off, just follow the orange arrows back up. Without a cannoneer, this part is pretty straightforward and should be easy.
Hooray, you've made it to the end. Compared to the second course, the scenic route for this one isn't actually that long, but there IS a faster way through this race. The next section covers the shortcut through Sunset Snowfield (this particular course, if you didn't gather that).
Path Two: The Shortcut [P2S]
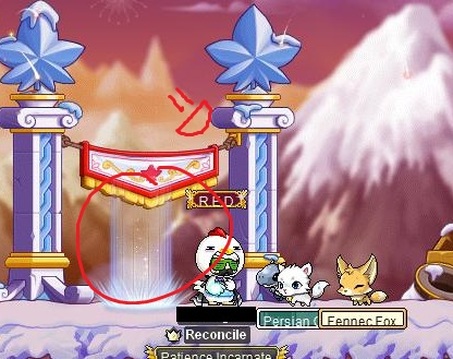
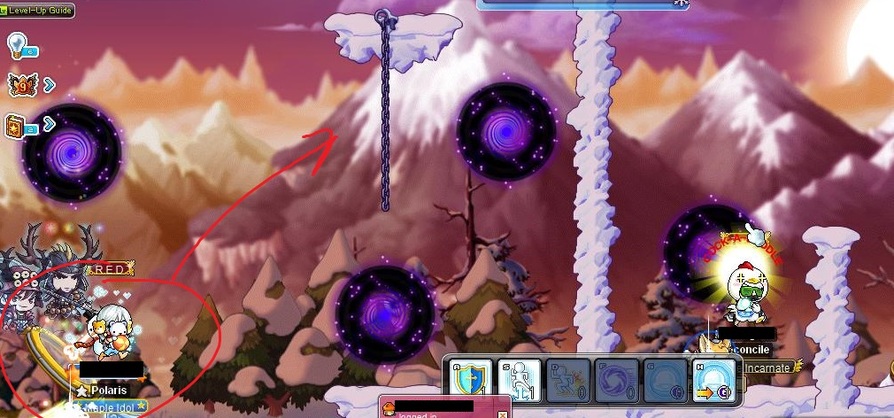
To take the shortcut, go to the left side instead of the right. Most people who take this path get about as far as that black void looking thing before they're teleported back to the beginning, which makes them take the other path instead. So, to keep yourself from being one of those people, let's find out how to use the shortcut.
When you fall off the ledge, you won't land where the chicken's at, but on top of that launcher. As you're landing on it, you'll be propelled in the direction of the red arrow, straight into the black void thing. This is where we finally learn what the voids do.
First you're here...
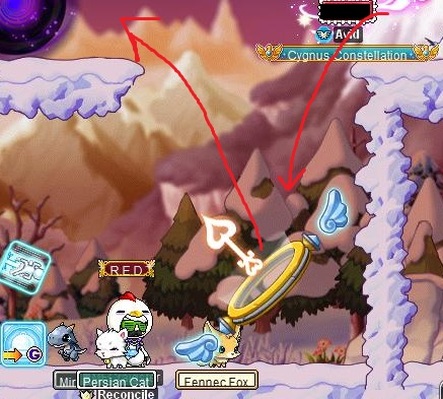
Wait, what? First things first: that launch pad. The black void from the screenshot before this one shows the chicken flying towards it, but then it cuts over to the launch pad. What the void does is teleport you to a different location on the map. In this instance, it lands you right on top of the launcher, so you don't have that much time to delve on where it's sent you. The next picture will explain how to get through this part.
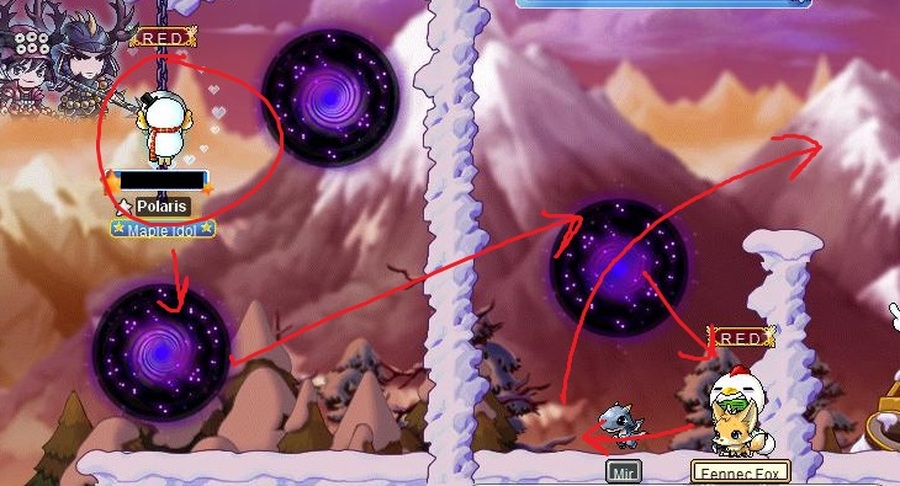
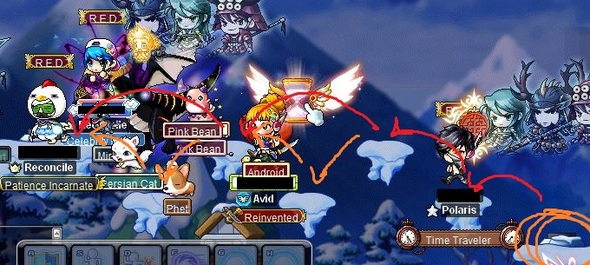
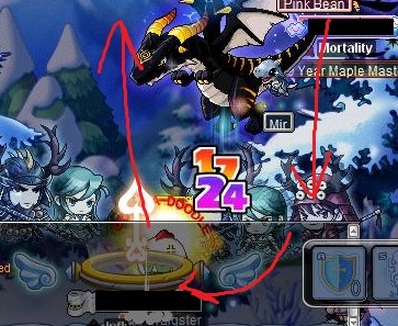
Okay, the arrows are a little confusing here, but bear with me. First off, in the last screenshot, you can see that the launch pad sends you towards the chain. As you're flying towards it, hold your UP button. This guarantees that you catch the chain and hang onto it instead of landing in that other void. People who don't know how to do this part will fly into that void and be teleported back to the beginning of the race. Once you're on the chain, slide down it into the bottom void. This one will teleport you across that wall and into the hole. The red arrows are rather deceiving in this picture; the void drops you in the open box and will bounce you towards that small wall, but you will 100% not make it over. You'll just slide down it and end up where the chicken is. Follow the next red arrow and walk to your left. There is an invisible launch pad in the ground (it propelled you at the small wall the first time you ended up in the box) that will fire you over the wall to the next part. IF YOU ARE NOT WEARING SNOWSHOES: I HIGHLY suggest holding your RIGHT button once you've been launched.
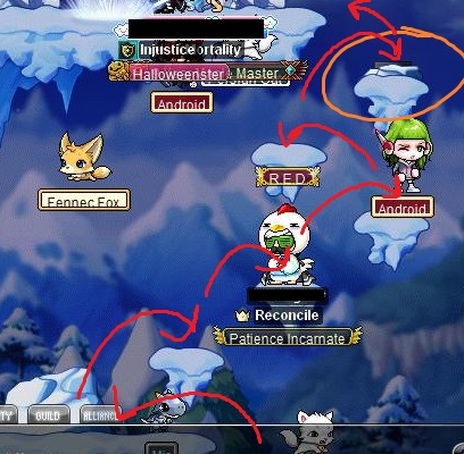
This part is tricky to get right. If you're wearing snowshoes, it's much easier, but if you aren't, there's a little trick to getting on the small platform and not falling off. Refer to the Helpful Tips section of this guide and look at The Anti-Sliding Trick. The quick rundown of how to do it is this: as you're flying over, hold your RIGHT button. Once you're getting close to the platform, hold your LEFT button. This will cancel out your momentum and make you stop on the platform. If you do this wrong, you WILL miss the platform completely. If that happens (and for a couple races, it probably will), just follow the orange path. If not, follow the red arrow path. Be careful of the flamespitter here. Once you've jumped across, you'll reach another launch pad. This one propels you upwards towards a part of the race you'll be familiar with if you've done the scenic route already.
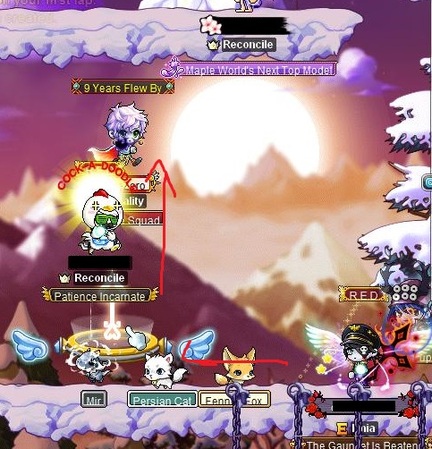
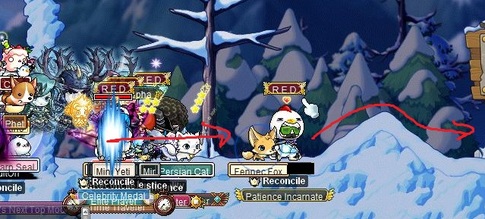
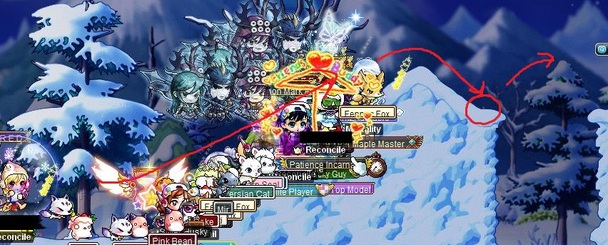
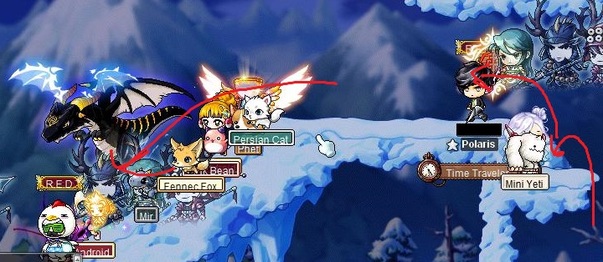
Look familiar yet? Notice the red circled area at the bottom of the screenshot. That's someone being launched upwards by the vertical launch pad in the previous picture. From here, you can refer back to the scenic route. The launcher sends you straight to the last stretch of the race.
On the other hand, if you took the orange path in the last screenshot instead...
You'll find yourself here. This goes straight up to the small platforms area in the scenic route (the one with the two flamespitters). You can refer back to that section for how to finish the race.
Congratulations, you now know the shortcut through the first race. It only takes one or two runs of the race to get used to finishing it, so just use this guide as a reference when you're not entirely sure.
COURSE TWO [CRS2]
When you first begin the race, you're trapped in a box in the bottom left corner of the map. In order to escape the box, use the only portal that's available; it will teleport you across that wall on the right side. From here, you have access to the main portion of the race.
Keep following the arrows. The beginning is pretty straightforward. There's really not much you can do about walking over that little bump in the road.
It's a little difficult to see with the hoard of people, but after the bump, there's two small holes you need to get past. The red arrow is what you would generally do: jump over them (you can, by the way). However, if you're self-conscious about missing the other side, follow the orange path.
Directly after the two holes, there's a slope that leads to another jumping portion. It's really easy to mess this part up, so pay special attention to where you start your jump. Where the diagram's been circled is probably the best place to begin pressing your jump button. It will give you an extra jump boost and guarantee that you'll make it across.
It's a little difficult to see, as in all of the other pictures, through the hoards of people. You should get used to this considering you'll have to see all of this, in motion, when doing the actual race. The red arrows show the typical path that you take. The orange circle (it's a little difficult to see) on the bottom of the screenshot is someone falling into the hole. This DOES happen if you aren't careful. For your first couple of runs, you might fall in, so it's important to know how to get out of it. On the far right side of the hole (this applies to both of them), walk to your left. There is an invisible launching mechanism in the ground that will propel you out of the hole in the path of the orange arrow. Chances are, you won't have enough momentum to make it across the ravine; take a couple of steps back up the mound, then turn around and attempt the jump again.
There is a small depression after the two jumps. You have two options here, not unlike the square holes back at the start of the race: you can choose to just walk through it, or you can launch yourself across it and put a marginal distance between you and the other racers. If you time the jump correctly, it will give you the same jump boost as the small curve below the mound. As a rule of thumb for these kinds of jumps, press your jump key just as you're starting to descend. It's riskier to try this at the depression because if you jump too late or too early, you actually lose momentum and slow down considerably, so pick your poison wisely.
There is a small depression after the two jumps. You have two options here, not unlike the square holes back at the start of the race: you can choose to just walk through it, or you can launch yourself across it and put a marginal distance between you and the other racers. If you time the jump correctly, it will give you the same jump boost as the small curve below the mound. As a rule of thumb for these kinds of jumps, press your jump key just as you're starting to descend. It's riskier to try this at the depression because if you jump too late or too early, you actually lose momentum and slow down considerably, so pick your poison wisely.
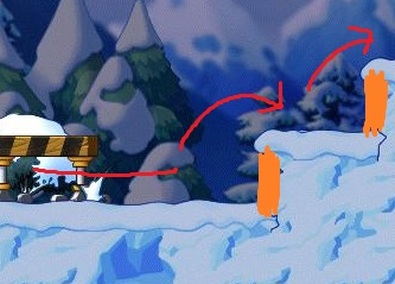
Directly after the depression in the path, you'll reach a set of stairs. The picture doesn't show it very well, but there's five steps in total. The red arrows are the path you should be taking to get up them, right down to where you should be starting your jumps. The orange blocks are zones you need to avoid. If you stand where the orange blocks are, you cannot climb the stairs. You'll be stuck jumping up and down in the same spot without making any progress. Step away from these areas if you get stuck at them, then make the jump again. To prevent yourself from sliding towards the orange areas, there's a couple of things you can do, which will be outlined in the Helpful Tips section below.

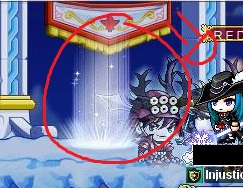
This part of the race is where a lot of people will mess up, but first off, the two red circled areas in the picture. If you've been keeping up with the race until now, this is most likely the first place you will encounter a power-up dropping. I won't go into depth about those quite yet, so keep reading (or if you want to skip to those, head to the Flag Race Skills section).
After you've gotten up all the steps, you'll see this neat looking arrow thing. As you've probably already guessed, it speeds you up in the direction of the glowing arrow. As for what you SHOULD be using it for, there's two ways you can go about this.
After you've gotten up all the steps, you'll see this neat looking arrow thing. As you've probably already guessed, it speeds you up in the direction of the glowing arrow. As for what you SHOULD be using it for, there's two ways you can go about this.
The above picture shows the area directly after you've been launched from the arrow. The red and orange arrows show the two directions you can go in to get past this part. In order to take the red arrow path, which is the fastest and safest one, you need to time your jump as you're passing the launcher. See the Helpful Tips section for more information on this launch. The red path will launch you across the chasm towards another launcher below the second red arrow. This one will catapult you upwards towards the third launcher, which will send you to a set of ropes. The orange circle is the location of another power-up spawn point.
The orange path isn't one I recommend taking, but sometimes, you'll fail to jump at the launcher and end up just sliding down the slope. In the picture to the left, I've made the arrow red (as it's the main path now) instead of orange. It's being blocked by the Energy Supply gauge, but there's a portal in the big hole you fall in when you don't make the jump. Use this to get back up to the first launcher to attempt it again. You can also see the aforementioned launcher that propels you upwards in this picture.
If your world has active cannon users, this part will piss you off. The red circled locations are places where power ups will spawn. There is another launcher past the right edge of the picture, but it's rare that anyone uses it. It launches you across the two cannons, but more often than not, you'll mess up and fall back down. The key to using it is to jump on the small platform underneath it first, then jump up towards the launcher.
The glowing ball in the orange circle is a cannon spawning. To use one of them, press whatever hotkey you have sit on. The cannonballs shot from these will piss you off like no tomorrow. If you're hit by one, you will be stunned for about 3-5 seconds, unable to move and most likely sliding off a ledge or just falling from a rope. You can't stand near the cannon when it fires, either. This will also stun you. The cannon does explode after a certain amount of time, but by then, you might be unable to finish the race.
The glowing ball in the orange circle is a cannon spawning. To use one of them, press whatever hotkey you have sit on. The cannonballs shot from these will piss you off like no tomorrow. If you're hit by one, you will be stunned for about 3-5 seconds, unable to move and most likely sliding off a ledge or just falling from a rope. You can't stand near the cannon when it fires, either. This will also stun you. The cannon does explode after a certain amount of time, but by then, you might be unable to finish the race.
Once you've made it past the cannons, there's another obstacle. Where the orange circles are is a flamespitter. Every couple of seconds, it will shoot a jet of fire that will damage and displace you, for better or worse. At this portion, it's best that you don't get hit by it. The platforms are pretty straightforward, and, as usual, there's two ways you can go about it. No need for a lengthy explanation.
This is the second set of platforms. Once again, pretty self-explanatory. The cannon, of course, will cause you a lot of problems if you have people using it, but otherwise, this part is easy.
It's rather hard to see, but directly behind the cannon, I've circled the location of another flamespitter. You DO want to be hit by this one. It's not much, but it gives you a small speed boost by pushing you forward. It will carry you over to the launcher on the left, which you can just walk through. Nothing too special about this part.
This next portion is a short maze that you really don't need to navigate through. Once you've been launched, it will automatically push you in the direction you need to go. There are invisible launchers at the corners of the maze; these will propel you through and up the other side.
A bit of a really important note for this part: don't slow yourself down anywhere at the bottom of the maze. If you don't have enough momentum, the launcher located in the red circled area will shoot you BACKWARDS to where the maze began. Try to be moving as fast as you can when you reach the red circle; if you don't, you might just be stuck at this part for awhile.
Continue following the arrows.
The next part is more platforms, but you won't have to worry too much about falling off of these. Jump across as shown, then over the wall on the far left side.
After you've jumped over the wall, you'll fall down to an almost empty chasm. There's one launch pad here, which you'll be using to get up to the final part of this jump quest.
This is the final stretch of the second course. After you've been launched upwards and land on the platform at the bottom of the picture, you'll start the last climb towards the finish portal. Be careful at this part; it's not unlikely for you to slip right off of the platforms here. The orange circle signifies the last flamespitter in the race; you DON'T want to be hit by this one UNLESS you're facing towards the final platform. If you time a jump wrong, it will knock you right off and make you start over.
Yay, welcome to the end. You only have to do the entire race two more times. Of course, you don't HAVE to. There are a couple strategies you can use, which you can find in the Strategies section below.
Congratulations on getting through your first lap, though.
FLAG RACE SKILLS [FRS]

You won't see this right away when you enter the race, but once the "Start!" sign shows up, so will this panel. These are all of the flag race power ups you can collect while you're going through the race. When the pictures are faded, it means you don't have the power up yet. The letters in the top left corner are the hotkey you need to press in order to use the skill (once you have it, of course). You can have more than one of the first four skills at a time; you can't have more than one of the last two. There is a 10 second cooldown between picking up skills.

The first power up, a shield. When used, it will protect you from taking damage. You will not be moved by flamespitters, cannon balls, or the purple power up as long as this power up is active.

The second power up is a mini launcher. it will propel you a short distance upwards from where it's activated.

The third power up is a dash. It will push you forward a certain distance, but you will get a long delay after it's displaced you.

The fourth power up is a portable cannon ball. When activated, it will launch a purple ball that will hit the first person it runs into, causing them to become stunned as if a cannonball hit them.

The fifth power up is a guild teleport skill. You can only hold one at a time, so use it wisely. Activating this skill will teleport you to a random guild member in the race.

The final power up is another guild teleport skill. Similar to the fifth one, you can only hold one at a time. Activating this skill will teleport a random member to your location.
HELPFUL TIPS [HTPS]
There are a couple things you can do to make the race a little easier to get through. In this section, we'll discuss some things you can take advantage of.

The Launch Jump
It only takes one or two tries to get this down, but it's a helpful skill nonetheless. When crossing launchers such as this, the red circle is generally where you'll start pressing your jump key. If you do it correctly, your character will be pushed slightly forward before leaving the ground. This is actually a good cue for when to press your jump button; once your character lurches forward, press it.
It only takes one or two tries to get this down, but it's a helpful skill nonetheless. When crossing launchers such as this, the red circle is generally where you'll start pressing your jump key. If you do it correctly, your character will be pushed slightly forward before leaving the ground. This is actually a good cue for when to press your jump button; once your character lurches forward, press it.
Using Snowshoes
This is recommended mainly for the first course, but can be used in the second course for certain parts of the race. Throughout both courses, moving around is similar to walking in El Nath: you'll be sliding around even when you don't want to. To combat this, you can wear snowshoes to prevent yourself from slipping right off of platforms. These are good for climbing up steps and jumping across small platforms. DO NOT USE THESE IN THE MAZE FOR COURSE TWO. You will NOT have the momentum from sliding and will be launched BACKWARDS to the start of the maze.
This is recommended mainly for the first course, but can be used in the second course for certain parts of the race. Throughout both courses, moving around is similar to walking in El Nath: you'll be sliding around even when you don't want to. To combat this, you can wear snowshoes to prevent yourself from slipping right off of platforms. These are good for climbing up steps and jumping across small platforms. DO NOT USE THESE IN THE MAZE FOR COURSE TWO. You will NOT have the momentum from sliding and will be launched BACKWARDS to the start of the maze.
The Anti-Sliding Trick
If you don't want to risk using snowshoes, there is another trick you can do that you can control. The great thing about this is that you can practice it anywhere with slippery ground. Simply walk in a direction, jump, and attempt to land without any extra sliding. It takes some getting used to, but once you've learned how to do this, snowshoes won't be necessary for either race. The key to this practice is timing. When you're moving in a direction, upon landing, you will continue to move in the direction of your momentum. To combat this momentum, turn your character around in midair; hold the opposite directional button down until you land, and let go a little under half a second after landing. You will be at the desired location, but you won't slide anywhere. This is incredibly helpful at the small platforms in both races, so it pays to at least attempt at practicing this.
If you don't want to risk using snowshoes, there is another trick you can do that you can control. The great thing about this is that you can practice it anywhere with slippery ground. Simply walk in a direction, jump, and attempt to land without any extra sliding. It takes some getting used to, but once you've learned how to do this, snowshoes won't be necessary for either race. The key to this practice is timing. When you're moving in a direction, upon landing, you will continue to move in the direction of your momentum. To combat this momentum, turn your character around in midair; hold the opposite directional button down until you land, and let go a little under half a second after landing. You will be at the desired location, but you won't slide anywhere. This is incredibly helpful at the small platforms in both races, so it pays to at least attempt at practicing this.
Using Flamespitters
There are times when using the flamespitters rooted in the ground can be somewhat helpful. They offer a tiny forward displacement and temporarily make you invincible to being hit by anything else. The flamespitter next to the cannon in course two, for example, is a good place to get hit by one. Make sure that when you do, you aren't facing towards the next progression of platforms. Since this location has two cannons you can be hit by, the temporary invincibility is extremely helpful. Simply get hit by the flamespitter and make a break for it across the platforms.
There are times when using the flamespitters rooted in the ground can be somewhat helpful. They offer a tiny forward displacement and temporarily make you invincible to being hit by anything else. The flamespitter next to the cannon in course two, for example, is a good place to get hit by one. Make sure that when you do, you aren't facing towards the next progression of platforms. Since this location has two cannons you can be hit by, the temporary invincibility is extremely helpful. Simply get hit by the flamespitter and make a break for it across the platforms.
Using Pets
So, earlier in the guide, I mentioned that you should take all of your pets out. Now, I'll explain why. If you went through the Flag Race Skills section, you'll know that there's a 10 second cooldown between picking up power ups. Having a pet, or pets, will bypass this cooldown for you. Each one of your pets will have its own cooldown timer for picking up skills, so if you have three pets, you can use each one to pick up ONE power up. That's 3 power ups for 3 pets, and then you have an additional power up that you can pick up yourself. More often than not, you won't even be picking up that many power ups, but it helps to always be able to pick one up in case you find a guild teleport skill.
So, earlier in the guide, I mentioned that you should take all of your pets out. Now, I'll explain why. If you went through the Flag Race Skills section, you'll know that there's a 10 second cooldown between picking up power ups. Having a pet, or pets, will bypass this cooldown for you. Each one of your pets will have its own cooldown timer for picking up skills, so if you have three pets, you can use each one to pick up ONE power up. That's 3 power ups for 3 pets, and then you have an additional power up that you can pick up yourself. More often than not, you won't even be picking up that many power ups, but it helps to always be able to pick one up in case you find a guild teleport skill.
STRATEGIES [STGS]
Coming soon.
